Since last year, Google Photos has been forcefully backing up your RAW photos to your Google account, whether you want it or not, which can be problematic if you’re low on space. Luckily, there’s a potential workaround to stop Google Photos from backing up your RAW images. You can also use it if you want to back up your RAW files separately instead of uploading them together with the JPEG ones.
Here’s how to disable Google Photos RAW image back up
Redditor andyooo shared a handy way to prevent RAW images you take with your Google Pixel from being automatically backed up to your Google Photos account, so you can decide later which ones you want to back up individually and save on cloud storage.
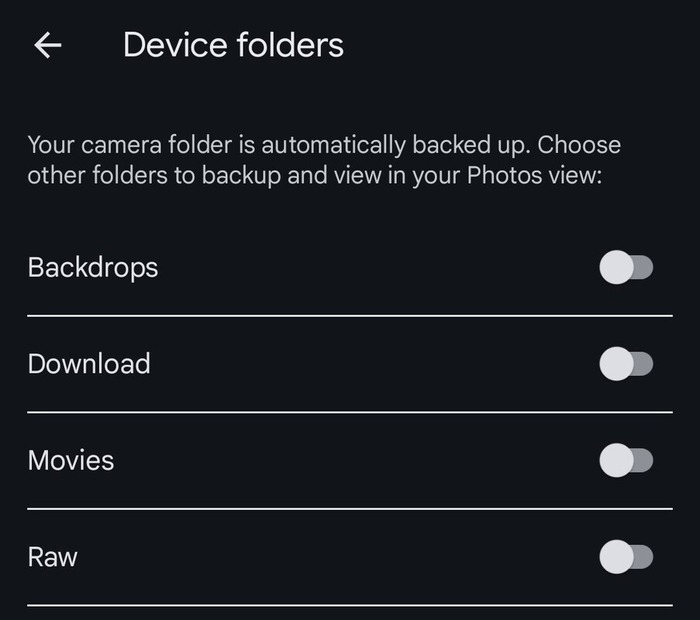
Currently, Google Photos automatically backs up both the JPEG and the associated RAW file in the same folder. So, to prevent RAW files from being uploaded, you will need to use the Tasker app to move them to a separate folder called ‘Raw’, which you need to create inside the ‘Pictures’ folder. Next, you need to make sure that the Google Photos backup option is disabled for that particular folder (Raw).
The user has created a Tasker profile with the necessary settings for the process to be automatic. After creating the folder mentioned above, you only need to download the Tasker app, download the profile, and import it for everything to work.
You may receive an error message during the process, possibly due to a lack of necessary permissions in the Tasker app. In that case, you just have to do the following:
- Tap on the Tasker triple-dot menu
- Tap on ‘More’
- Tap on ‘Android Settings’
- Tap on ‘Manage All Files’ and enable it
After completing the process, everything should work correctly.
How to backup RAW files separately
It’s noteworthy that there are users who do not want to stop backing up their RAW files to Google Photos but rather want it to work as it did before. In the past, Google Photos backed up JPEG and RAW files to separate folders for each one, but now it does so in the same folder.
If what you want is to recover the previous behavior of the RAW backup, the workaround above will also help you. The only difference is that you must activate Google Photos backup for the ‘Raw’ folder you created.
We hope that this guide will help you manage the backup of your RAW files to Google Photos to your liking.

Jean Leon
1613 Posts
A tech enthusiast since ever. I like to always be up to date on the latest news in the industry and write about it. Twitter: @jean_ERdC

Next article View Article