Are you bothered by the “Disk Unknown Not Initialized” or “You must initialize a disk” error on your Windows screen? Wondering what does initialize disk mean for a new or used drive and does initializing a disk erase data? This post will answer each query if you’re scratching your head over these questions. We’ll also provide four ways to initialize disk without losing data. So, read till the end!
What Does Initialize Disk Mean?
So, what does initialize disk mean in actuality? Initializing a hard disk means preparing it for a computer by rebuilding the Master Boot Record (MBR) for Windows access. Whether it’s new or used, this process lets the operating system access and manage partitions and system files.
You may need to initialize your new disk when you connect it to your PC and see the “you must initialize a disk” error. This means Windows can’t access the drive, and to fix this, you have to initialize the disk manually. But in another case, the same “you must initialize a disk” error can also occur in an existing disk due to driver issues.
When initializing an existing disk, you must choose either MBR or GPT as the partition style. Also, users often wonder, “Does initializing a disk erase data if the disk is in use?”
Does Initializing a Disk Erase Data?
So, does initializing a disk erase data? Unfortunately, the answer is not as straightforward as saying yes or no. Initializing a disk doesn’t wipe its data. However, to use the disk, you’ll need to partition and format it, which erases the data.
If your disk is new and empty, initializing is safe. But if there’s data, be cautious – initializing, followed by partitioning and formatting, can lead to data loss. But no worries, there’s a way to initialize disk without losing data, and we’ll get into that in the next section.
Is It Possible to Initialize Disk Without Losing Data?
When your disk is inaccessible, you must recover your data first to initialize disk without losing data. A third-party tool like 4DDiG Data Recovery can help retrieve your files from the hard drive regardless of whether it’s corrupted, formatted, deleted, or lost. Check out for yourself what more this tool can do:
- Retrieve 2000+ file types, including photos, video, images, and documents.
- Recover files lost due to accidental deletion, partition loss, systems crashes, and malware attacks.
- Compatible with all internal and external storage like disks, SD cards, USBs, digital cameras, NAS storage, and drones.
- Impressive success rate and 100% safety.
- Free recovery for files up to 100MB.
Here’s how to use this tool to recover data from the disk:
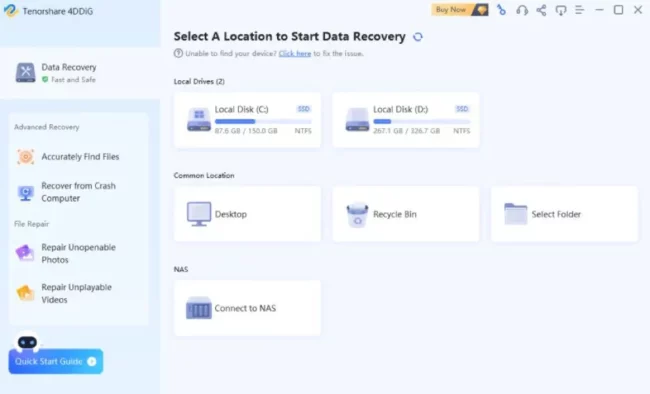
Step 1: Choose the Troublesome Disk
Install and launch the tool on your PC. Select the disk from which you want to recover data before initializing and click “Start.” You can also choose specific file types before scanning.
Step 2: Scan for File Recovery
The tool will search the drive for lost or inaccessible data, and you can pause or stop the scan anytime you find what you need.
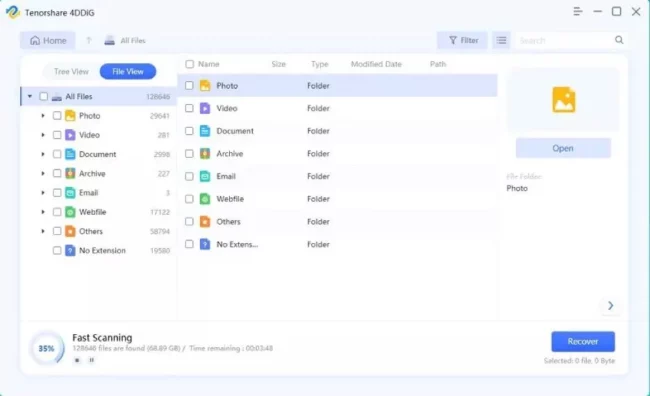
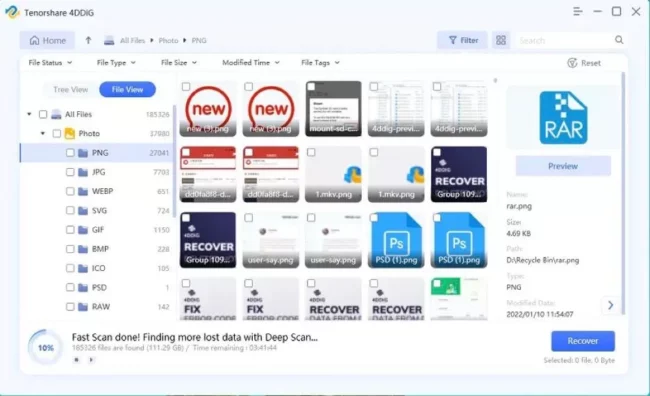
Step 3: Preview and Export Recovered Data
In the Tree View, you can preview categories like Deleted Files, Existing Files, Lost Location, or RAW Files. Or check File View for file types like Photo, Video, Document, etc. You can also search or use Filters on the right for a targeted file search. Once the files are recovered, preview and press “Recover” to export them to a secure location in another partition to prevent overwriting.
You can also check the video demonstration right below if you need a visual guide.
How to Initialize a Disk on Windows?
There are four steps to initialize disk without losing data, and they should be followed in sequence. The methods include reconnecting the disk, updating disk drivers, uninstalling and reinstalling the disk, and lastly, using Disk management initialize disk. Here they are:
1. Disconnect and Reconnect the Disk
The first step is to carefully disconnect and reconnect the hard disk to your PC. This is because your Windows might not be able to access a hard disk due to a connection issue, thus giving you the initializing disk error. If you’re using an external drive, try connecting it to another port.
2. Update Disk Drivers
You might get the “You must initialize a disk” error because of outdated disk drivers. Therefore, updating them can fix the issue. Here’s what to do:
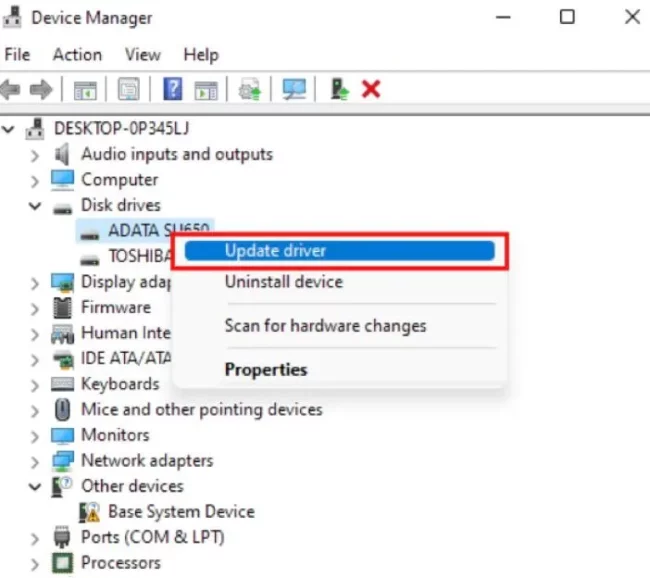
Step 1: Right-click “Start” to open “Device Manager.” Locate “Disk drives” and expand to see all devices.
Step 2: Right-click the troublesome drive and choose “Update driver.”
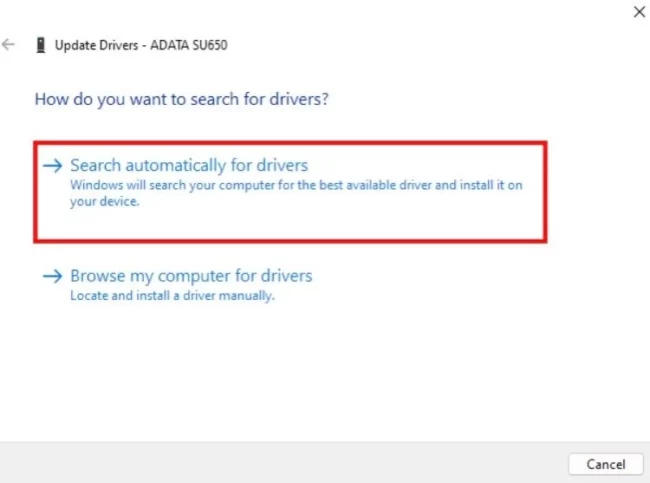
Step 3: Click “Search automatically for updated driver software” to let Windows find and install any available updates for the disk drive.
Step 4: You can also download a suitable driver from the manufacturer’s site. Then, choose “Browse my computer for driver software,” install the driver manually, and restart your computer.
3. Uninstall and Reinstall the Disk
If updating the disk drive doesn’t resolve the “You must initialize a disk” error, try uninstalling and reinstalling the disk. This will automatically locate and fix any corrupted drive issues. Follow the steps below to uninstall and reinstall the disk:
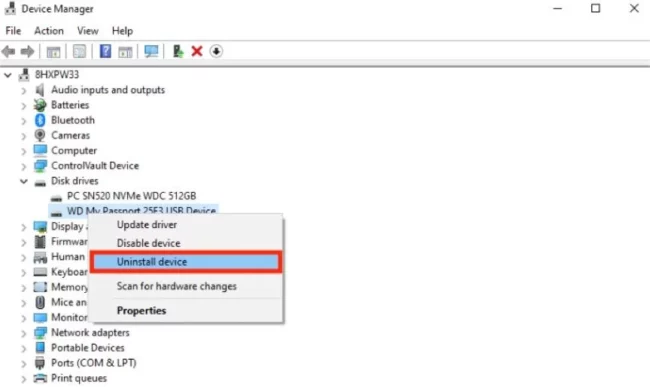
Step 1: Right-click “Start” to open “Device Manager.” Locate “Disk drives” and expand to see all devices.
Step 2: Right-click the troublesome drive and choose “Uninstall device” to uninstall it.
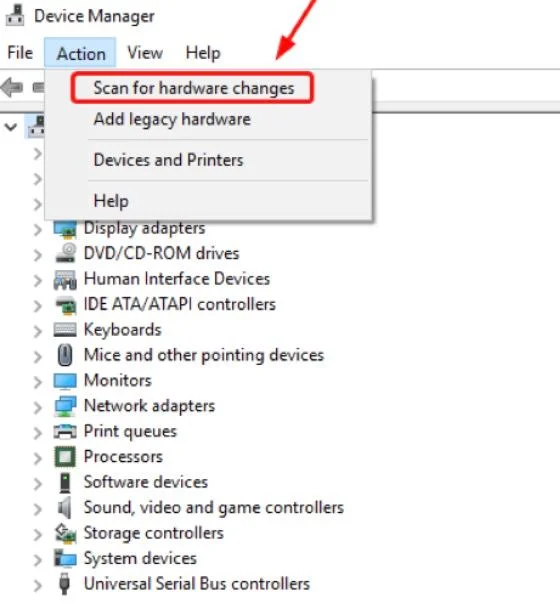
Step 3: Click “Action” in the above menu bar and select “Scan for hardware changes” to reinstall the drive.
Now, let’s talk about the ‘Disk Management Initialize Disk’ issue that users frequently discuss on the Microsoft Support Community.
4. Disk Management Initialize Disk
If the above methods have resolved the ‘You must initialize the disk’ error, or if you simply want to initialize your newly purchased disk, this will be the final step.
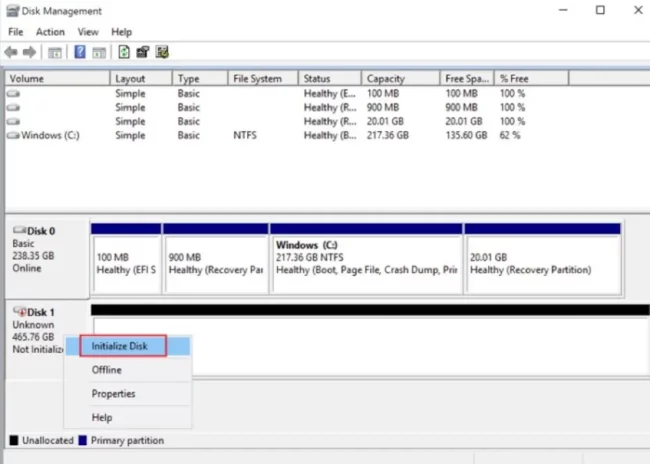
Step 1: Right-click on “Start” to open “Disk Management,” then right-click the uninitialized disk and choose “Initialize Disk.”
Step 2: Pick a partition style, like MBR or GPT, and click “OK.” That’s how to use Disk Management initialize disk.
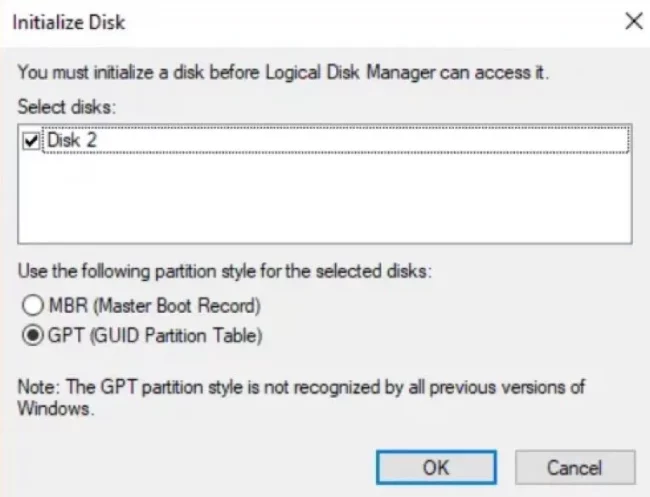
Remember, the choice between MBR and GPT depends on your needs and system limits. MBR can’t handle disks over 4TB and allows only four primary partitions. It is more compatible with older OS like Windows 7.
On the other hand, GPT supports nearly all storage devices, allows for 128 primary partitions, and is compatible with newer Windows like 8, 10, and 11.
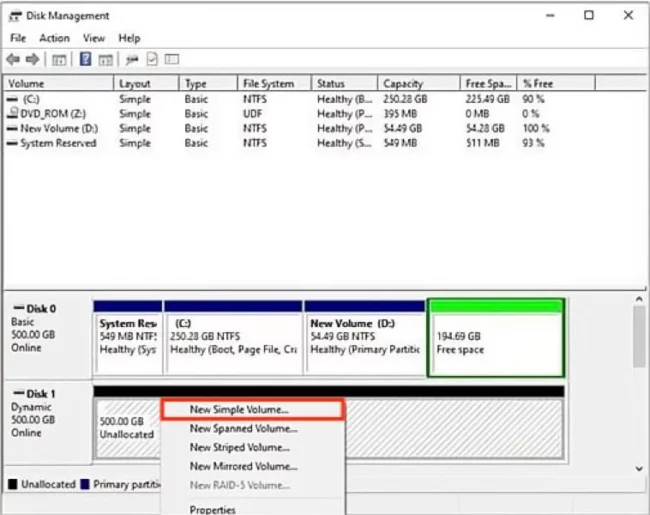
In the next step, you’ll still need to use Disk Management to make new volumes and set up a file system on the disk. Here’s what to do:
Step 1: Right-click on the unallocated space in the disk and choose “New Simple Volume.”
Step 2: Click “Next,” set up the file system and volume size, and assign a drive letter.
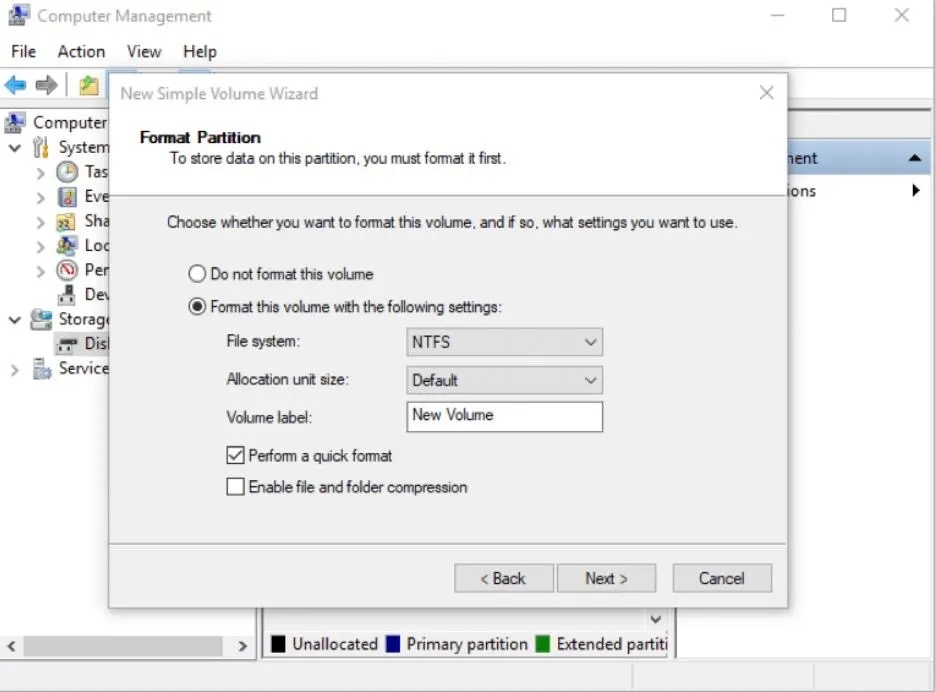
Step 3: Tick the “Perform a quick format” box and hit “Next” to start the formatting process.
That’s it! You have initialized a disk without losing data.
Initialize Hard Drive Without Losing Data FAQs
Q1: Should I initialize as MBR or GPT?
For new PCs with newer Windows OS like 8, 10, or 11 and storage needs exceeding 2 TB, GPT is recommended. Whereas MBR suffices for systems with older Windows OS like 7 and 2TB or smaller storage.
Q2: Do you have to initialize a disk?
Yes, before using a disk, you need to initialize it, and this process wipes everything on the disk. Initializing gets the disk ready for use in Windows. Remember, you can only do this if the drive hasn’t been formatted yet.
Q3: Can you recover data from uninitialized disk?
Yes, you can still retrieve your data if you have an uninitialized disk. Tools like 4DDiG Data Recovery make it easy and safe to recover data regardless of whether it is corrupted, formatted, deleted, or lost.
Conclusion
If you were thinking about what does initialize disk mean and how to initialize disk without losing data, this post has probably cleared up your confusion. Remember that initializing, followed by partitioning and formatting, leads to data loss.
To dodge that bullet, recover your data first with 4DDiG Data Recovery. Whether your files are corrupted, formatted, RAW, or deleted, this tool offers a stellar recovery rate, recovering 2000+ file types.
Disclaimer: This is a sponsored post, made possible in association with Tenorshare. PiunikaWeb doesn’t take any responsibility of the product being advertised here.
About the company: Tenorshare was founded in 2007, and provides solutions for data recovery, device content management, password recovery, system repair, and other smartphone and computer essentials.
TeamPW
548 Posts
Hello. Whenever an article gets published with the help of multiple people (like while training someone new OR in general contributed to by more than one writers), we use this author name to indicate team effort.
Next article View Article