An element of privacy is necessary with photos and videos. Google Photos is a platform that allows you to share pictures, but you don’t have to share every photo with others; hence there is an option of lock folders.
If you have a growing photo library, it is best to manage it through Google Photos. The app offers plenty of tools to make the entire video and image sorting process convenient as you can assemble them by people and events.
However, a major hurdle to uploading all the photos on a particular platform is potential misuse. In this article, we will show how you can hide photos and videos in Google Photos.
What’s the Locked folder in Google Photos?
All the images and videos you move into the locked folder won’t be available in albums, search results, memories, or the photo library.
Furthermore, they won’t be shown in any smart displays either.
There are a few requirements relating to Locked folders and how it operates in Google photos; as follows:
- The feature is available on Google Pixel 3 and higher devices.
- The feature is only available on the phone app and not the web version.
- It is not synced across other devices.
- The locked folder feature, unlike Google Photos, isn’t cloud-based. The photos or videos you transfer to the folder are downloaded on the Pixel device and protected using a password. The cloud backup copy is removed from the Google Photos library.
- Locked folder contents are deleted if the app data is removed for the Google Photos app. Hence, removing all data will also delete the contents in the locked folder.
- Photos in locked folders can’t be shared.
- The feature will use the same screen lock as your smartphone.
- You can’t take screenshots of the locked folder due to security reasons.
How to Set Up Locked Folder
Before adding any photos and videos to the locked folder in Google Photos in order to hide them, you need to set it up first:
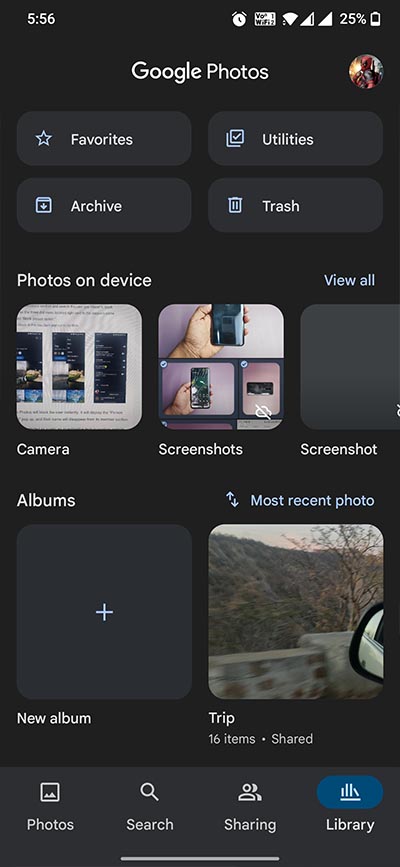
- Access the Google Photos application on the phone
- Choose the library tab located at the bottom
- Select utilities and then open the locked folder
- Click on the ‘set up locked folder option.’
- You will have to unlock the device through the unlock password/ pattern or PIN


Click/tap to enlarge images
How to add content into the Locked Folder on Google Photos
- Open the Google Photos application
- Choose all the pictures and videos that you want to insert into the locked folder
- Press the 3-dot menu button located at the top-right corner of the screen
- Choose the Move to Locked folder option
- Confirm your selection by pressing Move again.
For more Google Photos related info, check out this page.
PiunikaWeb started as purely an investigative tech journalism website with main focus on ‘breaking’ or ‘exclusive’ news. In no time, our stories got picked up by the likes of Forbes, Foxnews, Gizmodo, TechCrunch, Engadget, The Verge, Macrumors, and many others. Want to know more about us? Head here.


Asif Sameer
74 Posts
I am a technophile, writer, YouTuber, and SEO analyst who is insane about tech and enjoys experimenting with numerous devices. An engineer by degree but a writer from the heart.
Next article View Article