Our smartphones have become one of the most important tools that we carry with us every single day. Some may use it for entertainment while others may use it for business.
Whatever the case, we often store important documents, pictures, and even our passwords and pins for bank accounts on our phones. So setting a password or pin is recommended to prevent others from snooping around.
But in some situations, we might need to unlock the phone without a passcode or pin to be able to use it.
A few such scenarios are for instance when you forget your pin or passcode, get a second-hand phone but it’s secured, or when the biometric authentication such as face unlock or fingerprint unlock does not work.
If you’re stuck in a similar predicament, then you’ve come to the right place. In this guide, we’ll show you a couple of methods that you could use to unlock an Android phone without a password or pin.
Method 1: Using Google ‘Find My Device’
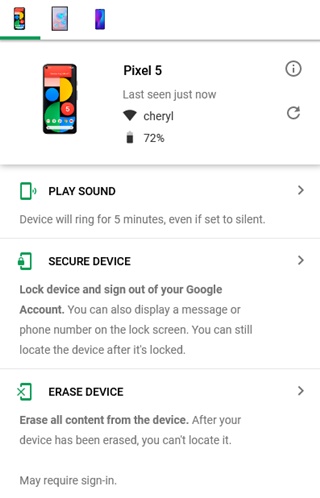
Google’s Find My Device is one of the most popular services that people use to locate or erase their devices in case it’s misplaced or stolen.
With Find My Device, you can locate, ring, or wipe your device from the web or any other smartphone with the app. Here are the steps you can use to access an Android device without the pin or password.
1. Head over to the Find My Device page and sign in with your Google Account that’s logged in on your smartphone.
2. From the left menu, select the ‘Erase Device’ option.
3. You should now see a warning message. If you’re willing to continue, then go ahead and click the ‘Erase Device’ option.
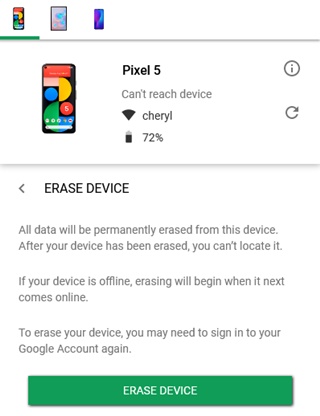
Once the device is erased, you should be able to use it and set it up as you would with a brand new device. That said, Find My Device isn’t the best way to unlock an Android smartphone without a password or pin.
This is because for it to work, the phone will have to be connected to the internet and will need to have the Location turned on. Further, Find My Device should be enabled on the device for this to work.
Another downside is that the device has to be signed in with your Google account and you should have access to the account. This means that if you purchase a second-hand phone that’s password or pin locked, this method won’t be useful to you.
But there’s no reason to fret. Here’s where we introduce the second method to unlock your Android phone without dealing with the lockscreen password or pin.
Method 2: Using DroidKit
DroidKit by iMobie makes up for just about every downside of Google’s Find My Device to remove the screen lock pin on Android.
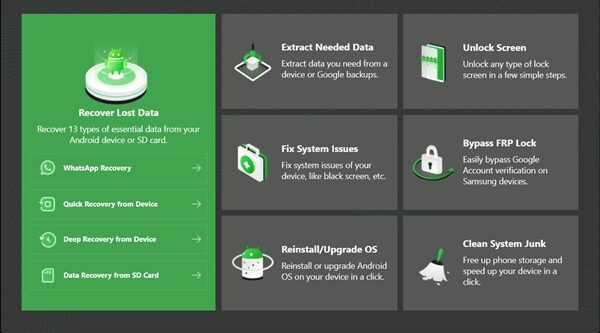
For starters, it does not matter what type of lockscreen security the device is locked with since it supports pin, password, pattern, fingerprint, face unlock, or any other device security measure.
iMobie also promises a high success rate as long as the device is on the list of supported devices. FYI, that list consists of over 20,000 devices. So it’s unlikely that your phone won’t be supported.
Unfortunately, devices from OnePlus aren’t supported but iMobie confirms that they’re working on bringing support for OnePlus smartphones too.
The best part, however, is that you don’t need to be signed in via Google or any other service on the Android phone that you wish to unlock without the password or pin.
So without any further ado, let’s dive into the steps:
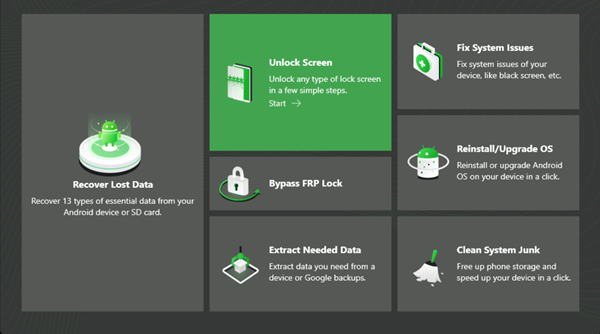
1. Download and install DroidKit on your Windows or Mac computer.
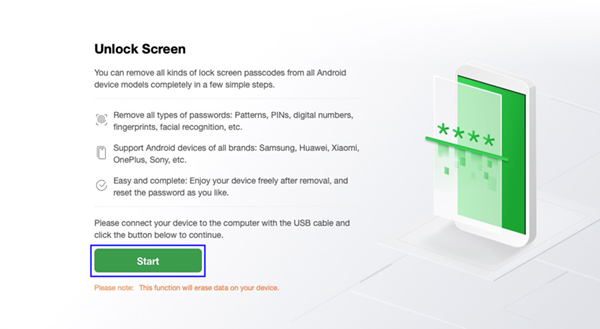
2. Once installed, load the tool on your computer and click on the ‘Unlock screen’ option in the homepage.
3. Now plug in your Android smartphone via a USB cable and then click the ‘Start’ button.
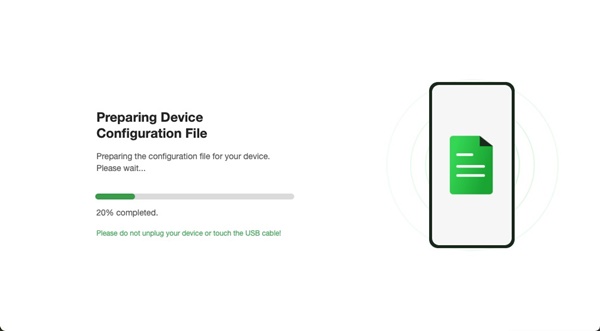
4. The tool will begin preparing a configuration file in order to unlock the lockscreen on your device without a password or pin.
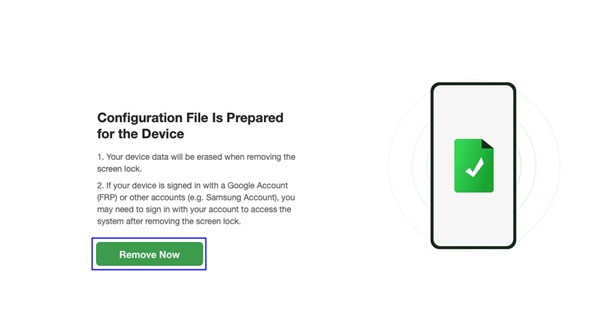
5. When the process ends, you’ll see the following screen. Simply click on ‘Remove Now’.
6. You will now see some instructions in DroidKit that will help you put the device in Recovery Mode and then wipe the Cache Partition on your device. Follow these steps carefully.
7. Once done, the tool will begin the process of removing the lockscreen password or pin from the device. Click on ‘Complete’ to finish the process.
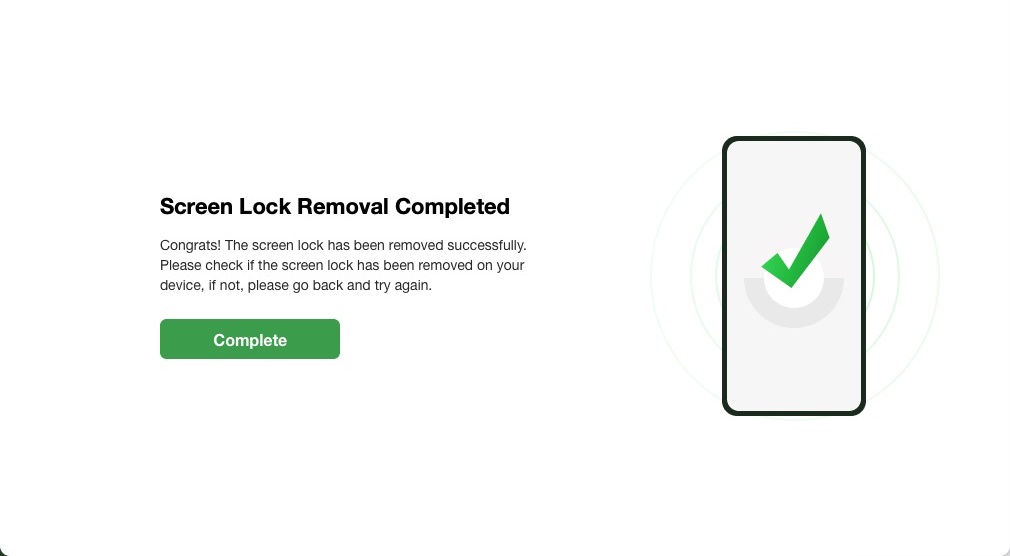
You will then be able to set up the phone from scratch again without having to worry about the previous lockscreen password or pin.
Of course, the previous data will also be erased from the device so that’s something you will have to keep in mind. That said, it’s the only way to bypass the lockscreen pattern, pin, or password on any Android phone.
To conclude, DroidKit isn’t only a tool that lets you access a phone without the password or pin. It offers a lot more features such as the option to recover lost data, clean junk files, fix system issues and more.
Disclaimer: This is a sponsored post, made possible in association with iMobie. PiunikaWeb doesn’t take any responsibility for the product being advertised here as well as how these applications are used.
About the company: iMobie currently develops content management, iOS data recovery, and iPhone/Mac maintenance utility software and was established in 2011. It has catered to over 8 million users since then.
PiunikaWeb started as purely an investigative tech journalism website with main focus on ‘breaking’ or ‘exclusive’ news. In no time, our stories got picked up by the likes of Forbes, Foxnews, Gizmodo, TechCrunch, Engadget, The Verge, Macrumors, and many others. Want to know more about us? Head here.

Tags
Android lockscreen bypass Android phone unlock without password Unlock Android phone without pin
TeamPW
548 Posts
Hello. Whenever an article gets published with the help of multiple people (like while training someone new OR in general contributed to by more than one writers), we use this author name to indicate team effort.
Next article View Article